How to Find and Seal Air Leaks in Your Home
A practical method for locating air leaks without special equipment, which ones are worth sealing first, and the materials that actually hold up.
- Most leaks sit at the top and bottom of the house — attic penetrations, rim joists, sill plate — not around windows.
- Work in three levels: look first, then a simple depressurization test with combustion appliances off, then a professional blower door test for a real number.
- Match the material to the gap: caulk under ¼ inch, expanding foam up to about 3 inches, fire-rated sealant near flues and chimneys.
- A house can be sealed too tightly — combustion appliances need enough air to vent safely, so get combustion safety checked on any serious sealing project.
- ENERGY STAR estimates about 15% savings on heating and cooling for a package of air sealing plus insulation done together.
On this page
- Air leakage and missing insulation are different problems
- Level 1: what you can find by looking
- Level 2: simple tests you can do safely
- Level 3: what a professional audit adds
- Matching the material to the gap
- When sealing more can create a new problem
- What it saves, and what that figure covers
- When results will differ
- What to do next
Air leakage is the loss people underestimate, partly because you cannot see it and partly because the obvious suspect — the drafty window — is rarely the main culprit. The useful approach is to work in levels, spending nothing until looking stops finding things.
Air leakage and missing insulation are different problems
This distinction decides your whole sequence. Insulation resists heat conducted through a material — that is what R-value measures. Air sealing stops air physically moving through a gap and carrying heat with it. A wall can be well insulated and still leak badly, and blown insulation laid over an unsealed ceiling penetration conceals the hole without closing it. DOE's guidance is to seal first, then insulate.
Level 1: what you can find by looking
Costs nothing, takes an afternoon, and finds the large leaks that account for most of the loss in an older house. Work top and bottom before you touch the middle.
- Attic hatch or pull-down stairs — frequently a large uninsulated, unweatherstripped hole in the ceiling.
- Recessed light fixtures, and ceiling penetrations for wiring, plumbing vents and bath fans.
- The rim joist band in the basement or crawl space, where the floor framing meets the foundation wall.
- Where the sill plate sits on the foundation.
- Around chimneys and flue chases — note them now, seal them only with fire-rated material.
- Behind and around plumbing under sinks, and where cables enter the building.
- Baseboards, outlet and switch plates on exterior walls.
- Then, and only then, doors and windows.
Level 2: simple tests you can do safely
These exaggerate what is already happening so you can locate it. They confirm and rank the leaks you found by looking; they do not measure anything.
- A wet hand held near a suspect joint on a cold day — evaporation makes a draft you can barely feel obvious.
- A single sheet of thin paper or tissue held at the edge of a closed window or door, watching for movement.
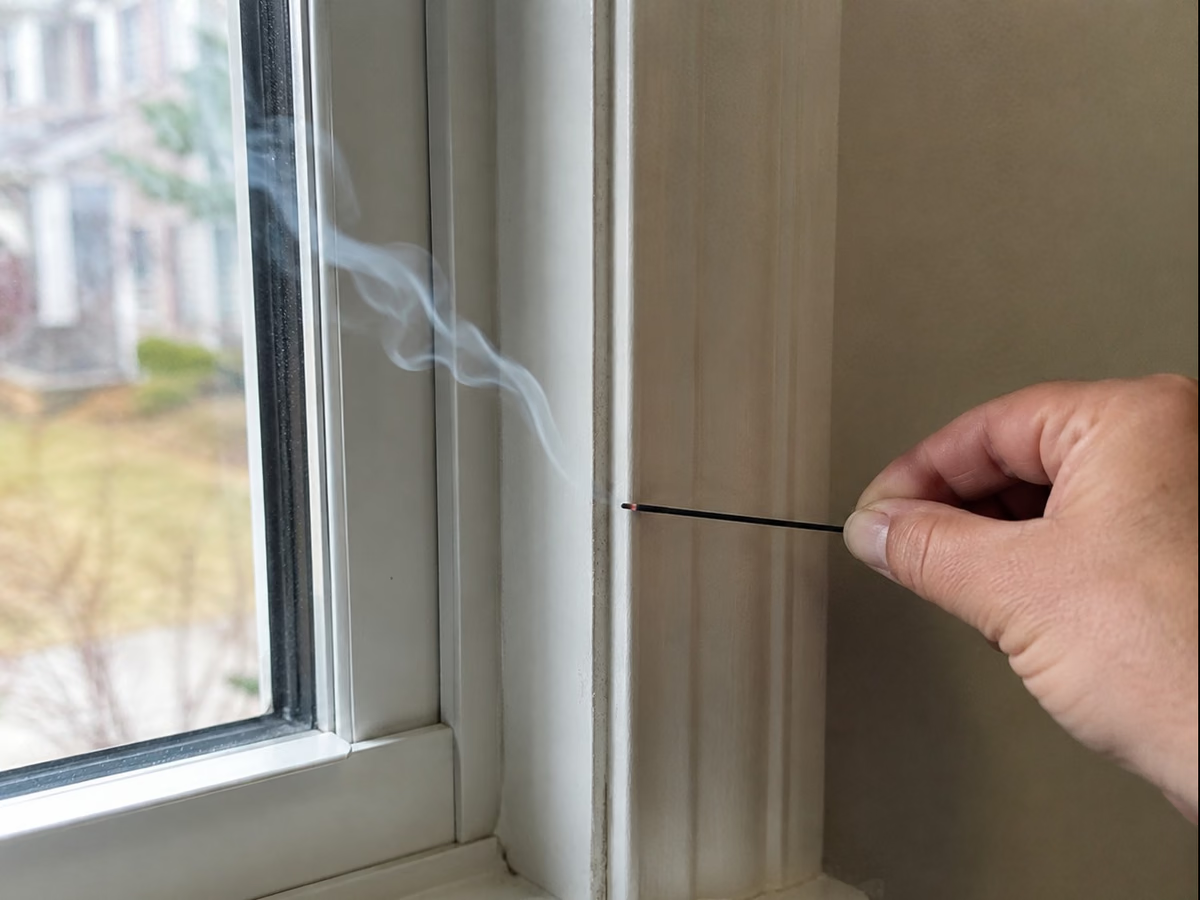
- A lit incense stick moved slowly past the same points, watching where the smoke bends. This is DOE's described method and works best on a cold, windy day with the house closed up and the exhaust fans running.
- A thermal camera, including phone attachments, but only with a large indoor-outdoor temperature difference and with the understanding that it shows surface temperature — a cold spot can be missing insulation, a thermal bridge, or a leak, and the image alone will not tell you which.
Level 3: what a professional audit adds
This is where you stop guessing. It costs money and it is the only route to a defensible before-and-after number.
| Test | What it measures | Why it matters |
|---|---|---|
| Blower door | Airflow needed to hold the house at 50 pascals, reported as ACH50 | Turns leakiness into a number you can compare before and after the work |
| Thermographic scan | Surface temperature across walls and ceilings under that pressure | Locates leaks and missing insulation that a walkthrough misses entirely |
| Combustion safety test | Draft, spillage and carbon monoxide at each appliance | Confirms flue gases still leave the building after the envelope is tightened |
| Duct leakage test | Air lost from the duct system itself | Duct leaks in an unconditioned attic can dwarf every envelope leak you found |
Matching the material to the gap
| Situation | Material | Note |
|---|---|---|
| Gaps under ¼ inch | Caulk | Interior or exterior grade to suit the location |
| ¼ inch to about 3 inches | Expanding spray foam | Low-expansion around windows and doors, or it will bow the frame |
| Large or irregular openings | Rigid foam board cut to fit, sealed at the edges | Foam alone cannot bridge a wide gap reliably |
| Around flues and chimneys | Fire-rated sealant or sheet metal | Never standard foam or caulk — these surfaces get hot |
| Moving parts: doors, window sashes | Weatherstripping | Caulk seizes anything that has to move |
| Attic hatch | Weatherstripping plus rigid foam on the back | Usually the single largest ceiling leak in the house |
| Ductwork joints | Mastic, or foil tape rated for the purpose | Ordinary duct tape fails on ducts, which is a long-standing irony |
When sealing more can create a new problem
Air sealing is one of the few home upgrades where doing too much of it, carelessly, makes things worse. EPA lists infiltration as one of three ways outdoor air enters a home, alongside natural and mechanical ventilation. Removing infiltration without providing a replacement changes what you breathe.
- Combustion appliances that vent by natural draft rely on the house not being strongly depressurized. Tighten the envelope and add a powerful range hood, and you can create the conditions for exhaust to spill indoors.
- Moisture that used to leave through leaks now stays. Watch for condensation on windows and cold surfaces in the first winter after a serious sealing job.
- Indoor pollutants — cooking, cleaning products, off-gassing, radon where it is present — concentrate faster in a tighter house.
- Beyond a certain tightness a home needs mechanical ventilation rather than accidental leakage to supply fresh air. That is a design decision, not a DIY afterthought.
What it saves, and what that figure covers
ENERGY STAR estimates an average of 15% of heating and cooling costs, or about 11% of total energy costs. Three qualifications matter before you apply it to your own house: it covers a package of air sealing plus insulation across the attic, crawl space floors and rim joists rather than caulking alone; it comes from modeling a composite U.S. home built between 1970 and 1989, not from measuring real houses afterward; and it is an average across a range of roughly 5% to 16% by climate zone, higher in the North.
When results will differ
- A 1920s balloon-framed house and a 2015 build start from completely different leakage levels, so the same work produces completely different savings.
- Windy, exposed sites lose more through identical gaps than sheltered ones.
- In humid climates, sealing changes indoor moisture behavior more than it changes the bill.
- If your ducts run through an unconditioned attic, duct sealing may be worth more than everything in level 1 combined.
What to do next
Do one session in the attic and one in the basement before buying anything for the windows — those two areas hold the largest, cheapest wins and they make any insulation you add afterward work as intended. If you have combustion appliances, or if you are planning enough work to change how the house breathes, book the audit first and let the blower door tell you where you started.
Sources
- Air Sealing Your Home — U.S. Department of Energy — Energy Saver. Consulted July 22, 2026.
- Seal and Insulate — savings estimate methodology — U.S. EPA / DOE — ENERGY STAR. Consulted August 1, 2026.
- Home Performance with ENERGY STAR — minimum requirements (blower door and combustion safety testing) — U.S. EPA / DOE — ENERGY STAR. Consulted August 1, 2026.
- Improving Indoor Air Quality (source control, ventilation, filtration) — U.S. Environmental Protection Agency. Consulted August 1, 2026.
- Insulation — U.S. Department of Energy — Energy Saver. Consulted July 22, 2026.
Frequently asked questions
How do I find air leaks without special tools?
On a cold, windy day, close all windows and exterior doors, turn off every combustion appliance first, then run the bathroom and kitchen exhaust fans to lower the indoor pressure. Move a lit incense stick slowly past the usual suspects and watch where the smoke bends. Never use a candle or any open flame for this.
What is a blower door test and do I need one?
A calibrated fan mounted in an exterior door depressurizes the house to a standard 50 pascals and measures the airflow required to hold it there, which is reported as air changes per hour at that pressure — ACH50. You do not need one to seal the obvious leaks, but it is the only way to get a number rather than an impression, and it lets you prove what a job actually achieved.
Are windows really the main source of leaks?
Usually not. The largest losses tend to be at the top and bottom of the building — attic penetrations and the basement rim joist — because that is where the pressure difference driving the leak is greatest. Windows are visible and annoying, which is a different thing from expensive.
Can a house be too airtight?
Yes. EPA describes infiltration as one of the three ways outdoor air enters a home, alongside natural and mechanical ventilation — so reducing it without replacing it changes your indoor air. Any home with a natural-draft combustion appliance also needs enough air for that appliance to vent properly. ENERGY STAR's contractor program treats combustion safety testing as a requirement when air sealing is done.
Is air sealing the same as adding insulation?
No, and they fail differently. Insulation slows heat conducted through a material; air sealing stops air carrying heat through a gap. Insulation laid over an unsealed penetration hides the leak without closing it, which is why DOE recommends sealing first.